Ever wondered how your mountain bike’s suspension actually works?
Wonder no more, our guest suspension expert Paul Mackie is here to break it down for you in easy to digest chunks.
Part 2: Pivot Location and Arrangement.
photos by Ian Lean / Roo Fowler / Pete Scullion / Jacob Gibbins / Red Bull
In this series, our man Paul helps break down the science behind suspension, putting the much bounded about jargon that fills bike chat into layman’s terms. Part 2 covers a fundamental part of rear suspension, pivot location and arrangement.
Who is Paul you ask? He’s a suspension nerd, engineer, not-too-shabby enduro racer and designer for a mountain bike brand.

Is it just black magic?
VPP, instant centre, rising-rate, single-pivot, anti-squat, brake jack, progressive, kinematics, four-bar, faux-bar, gay-bar.
These are all terms that get banded around when talking about mountain bike rear suspension (well, most of them anyway). But how many of us really understand what these mean?
Is suspension design black magic or just simple physics?
I’m going to de-bunk suspension related jargon and help you to understand how suspension works in everyday language. As rear suspension systems are a challenging topic with many inter-related aspects, this article is broken down into seven bite size parts.
Take a deep breath, hold my hand, here goes…

The curious thing about mountain bike suspension is that the front fork is telescopic, whereas the rear is typically a swingarm that rotates around a pivot (or pivots). So, the front wheel travel is a linear motion, whereas the rear is rotational.
There is a multitude of pivot locations and arrangements currently available but it takes a keen eye to spot the difference. The most prominent ones are:
– Single Pivot
– Four-Bar
– Virtual Pivot Point (VPP), or Short Dual Link (SDL).
Other systems exist such as sliding rails, unified rear triangles, split pivots, telescopic arms, migrating bottoms brackets, etc. but essentially the three prominent ones listed above are the main ones on the market today.
Axle path and swingarm pivot positioning.
Ignoring the actuation of the rear shock and drive-chain influence, the positioning of the pivots directly affects the motion of the rear wheel when the suspension moves, commonly known as the ‘axle path’ or ‘wheel path’. Imagine having your bike in a work stand with no chain and no shock and moving the rear wheel through its travel unhindered. The swingarm pivot (or pivots depending on the suspension configuration) dictate the direction of the axle path.
The simplest form of this arrangement is a single pivot bike (think Orange Five). The rear wheel is attached to the ‘swingarm’ which rotates around a pivot attached to the front triangle of the frame. The axle path is therefore an arc with the centre at the swingarm pivot.
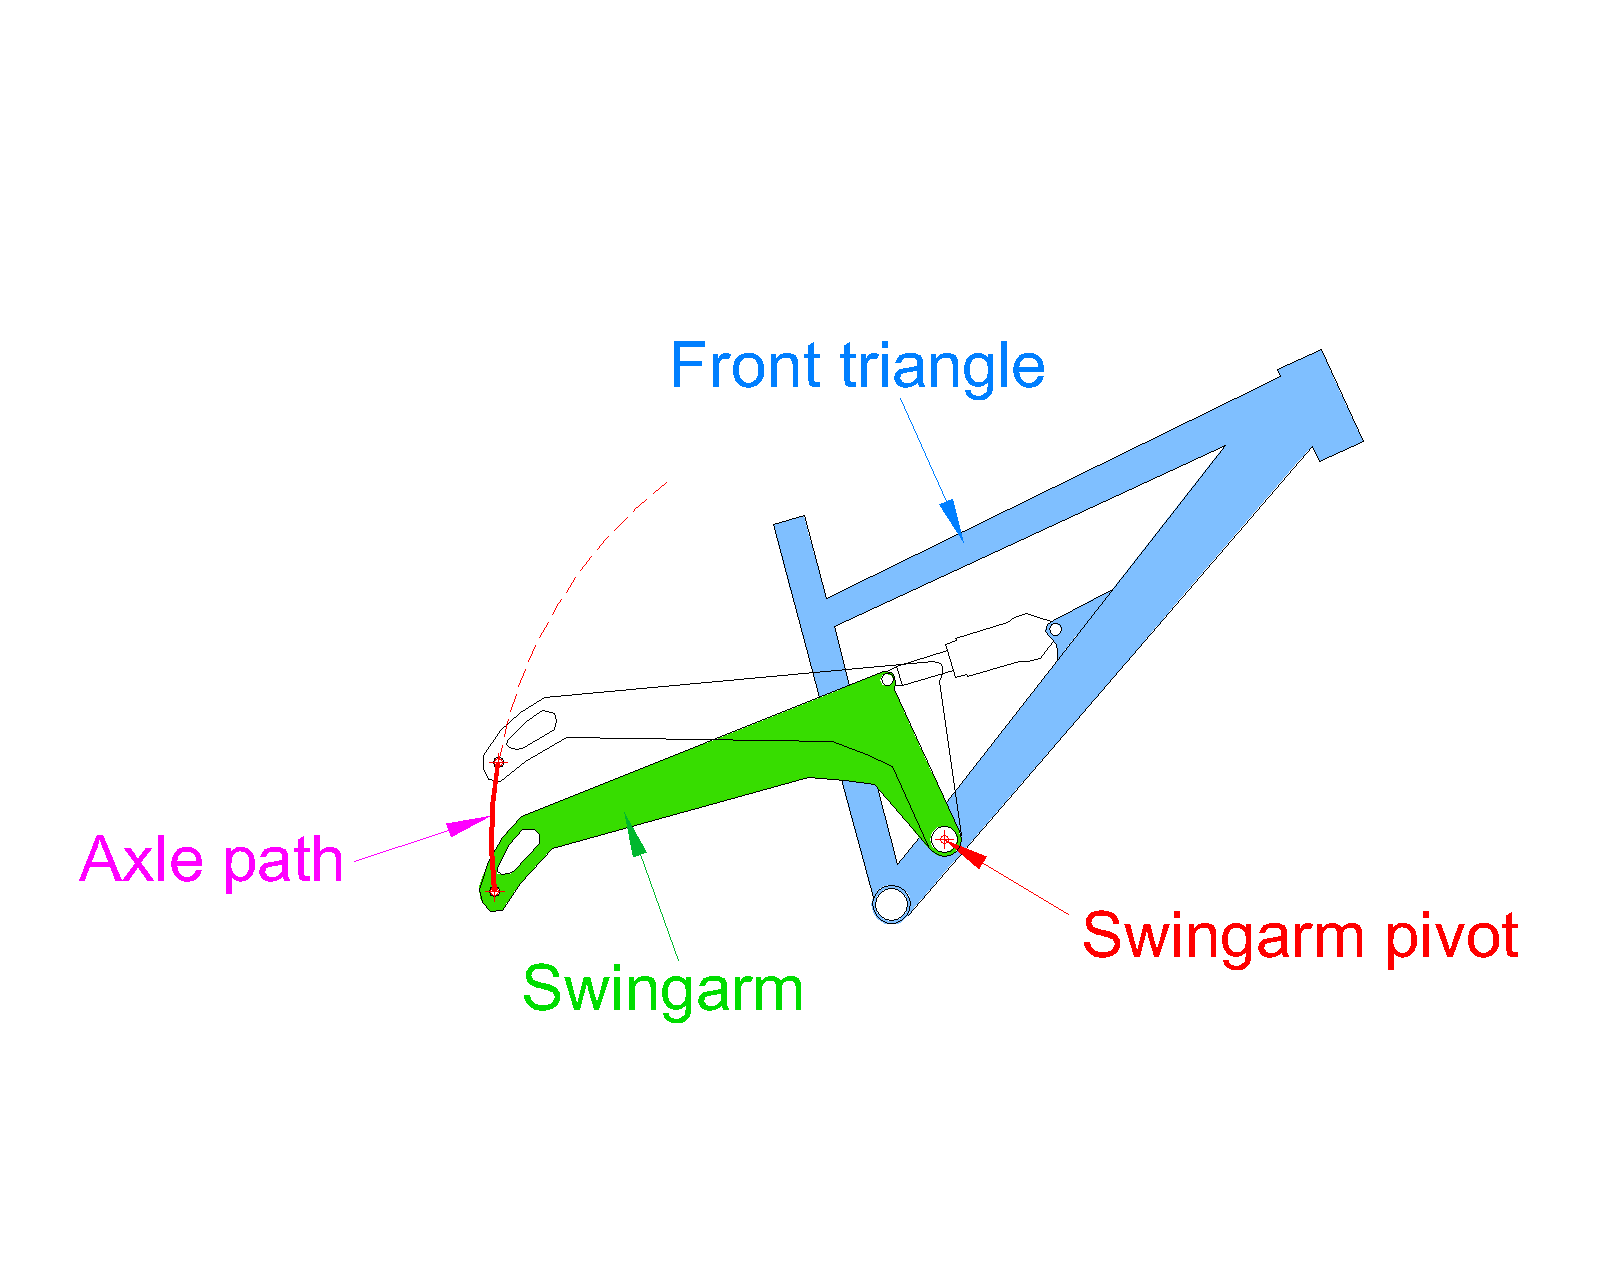
Diagram shows the swingarm and axle path of a single pivot Orange 5.
The significance of the axle path is debated, but in an ideal world the wheel should move in a direction concurrent with terrain obstacles – this is where a high pivot placement (think Commencal DH V4) works well. A simple way to understand this is to draw a line between where the terrain obstacle comes in contact with the wheel and the axle – this is essentially the direction of the resultant force and ideally the direction of the wheel axle path to absorb it.
Obviously bigger the terrain object, the more the axle path has to move in a backward direction. Another way to understand this is to look at the angle of the front fork – this is pretty much in the direction of the resultant force for that type of riding style (slack angle for DH bikes which hit bigger obstacles, and steep angle for XC bikes which typically ride over less severe terrain).
However, a high pivot placement creates other problems, especially with the drive-chain (more of that later). The diagram below shows how a high pivot bike produces and axle path that is roughly in-line with the resultant force caused by the terrain obstacle.

Diagram shows indicative directions of resultant forces transmitted through the wheels of a mountain bike encountering terrain obstacles
Arguably, if mountain bikes just went downhill, and there was no need to pedal them, then a high pivot system without a drive-chain would be a pretty good solution. Other aspects such as brake-jack and variable geometry also affect this system which is possibly why it hasn’t taken prominence, despite several attempts over many years (Commencal DH V4, Trek Session 10, Balfa BB7, Ghost DH 9000, even the new prototype Norco Aurum) – it’s a design solution that keeps re-appearing, but never seems to cut sway.
An early example of a high pivot suspension system that didn’t make allowance for drive-chain forces was the 1993 Trek 9500. It doesn’t take a genius to see that as the swingarm moves through its travel it is tugging on the drive-chain, or conversely the drive-chain is impeding the free movement of the swingarm.


At the other end of the scale, a low pivot point produces an axle path that is not conducive to bump absorption when a terrain obstacle is encountered as the axle path is not in-line with the resultant force direction (see figure below of an old skool 2007 Cove G-sport which had a swingarm pivot around the BB – as low as you can practically go.

Diagram showing the axle path of a 2007 Cove G-spot with a swingarm pivot around the BB.
So, most bike designs out there have a pivot point location somewhere between the high and low extremes of the Trek 9000 and Cove G-spot described above. This ‘common’ pivot location creates a typical axle path movement:
1. Initially backwards
2. Vertical
3. Slightly forwards at end of stroke

The diagram above shows a typical axle path for a 150mm ‘all-mountain’ bike
The reasons for this common axle path is a combination of balancing bump compliance (backwards), beneficial/ detrimental drive-chain influence, and also maintaining a stable geometry. The position of the swingarm pivot, especially the height is critical in this aspect – everything literally hangs off this.
If the pivot is too low the wheel will have an axle path not conducive to bump absorption (think Cove G-spot), too high and drive-chain forces become too much of an influence (Trek 9000). You’ll also get severe pedal kickback on big landings with a high pivot system. Typically, for a single pivot bike (think Orange 5) the pivot placement is about 55mm in front of the BB centre and 70mm above.
So why have a virtual pivot bike and what is an instant centre?
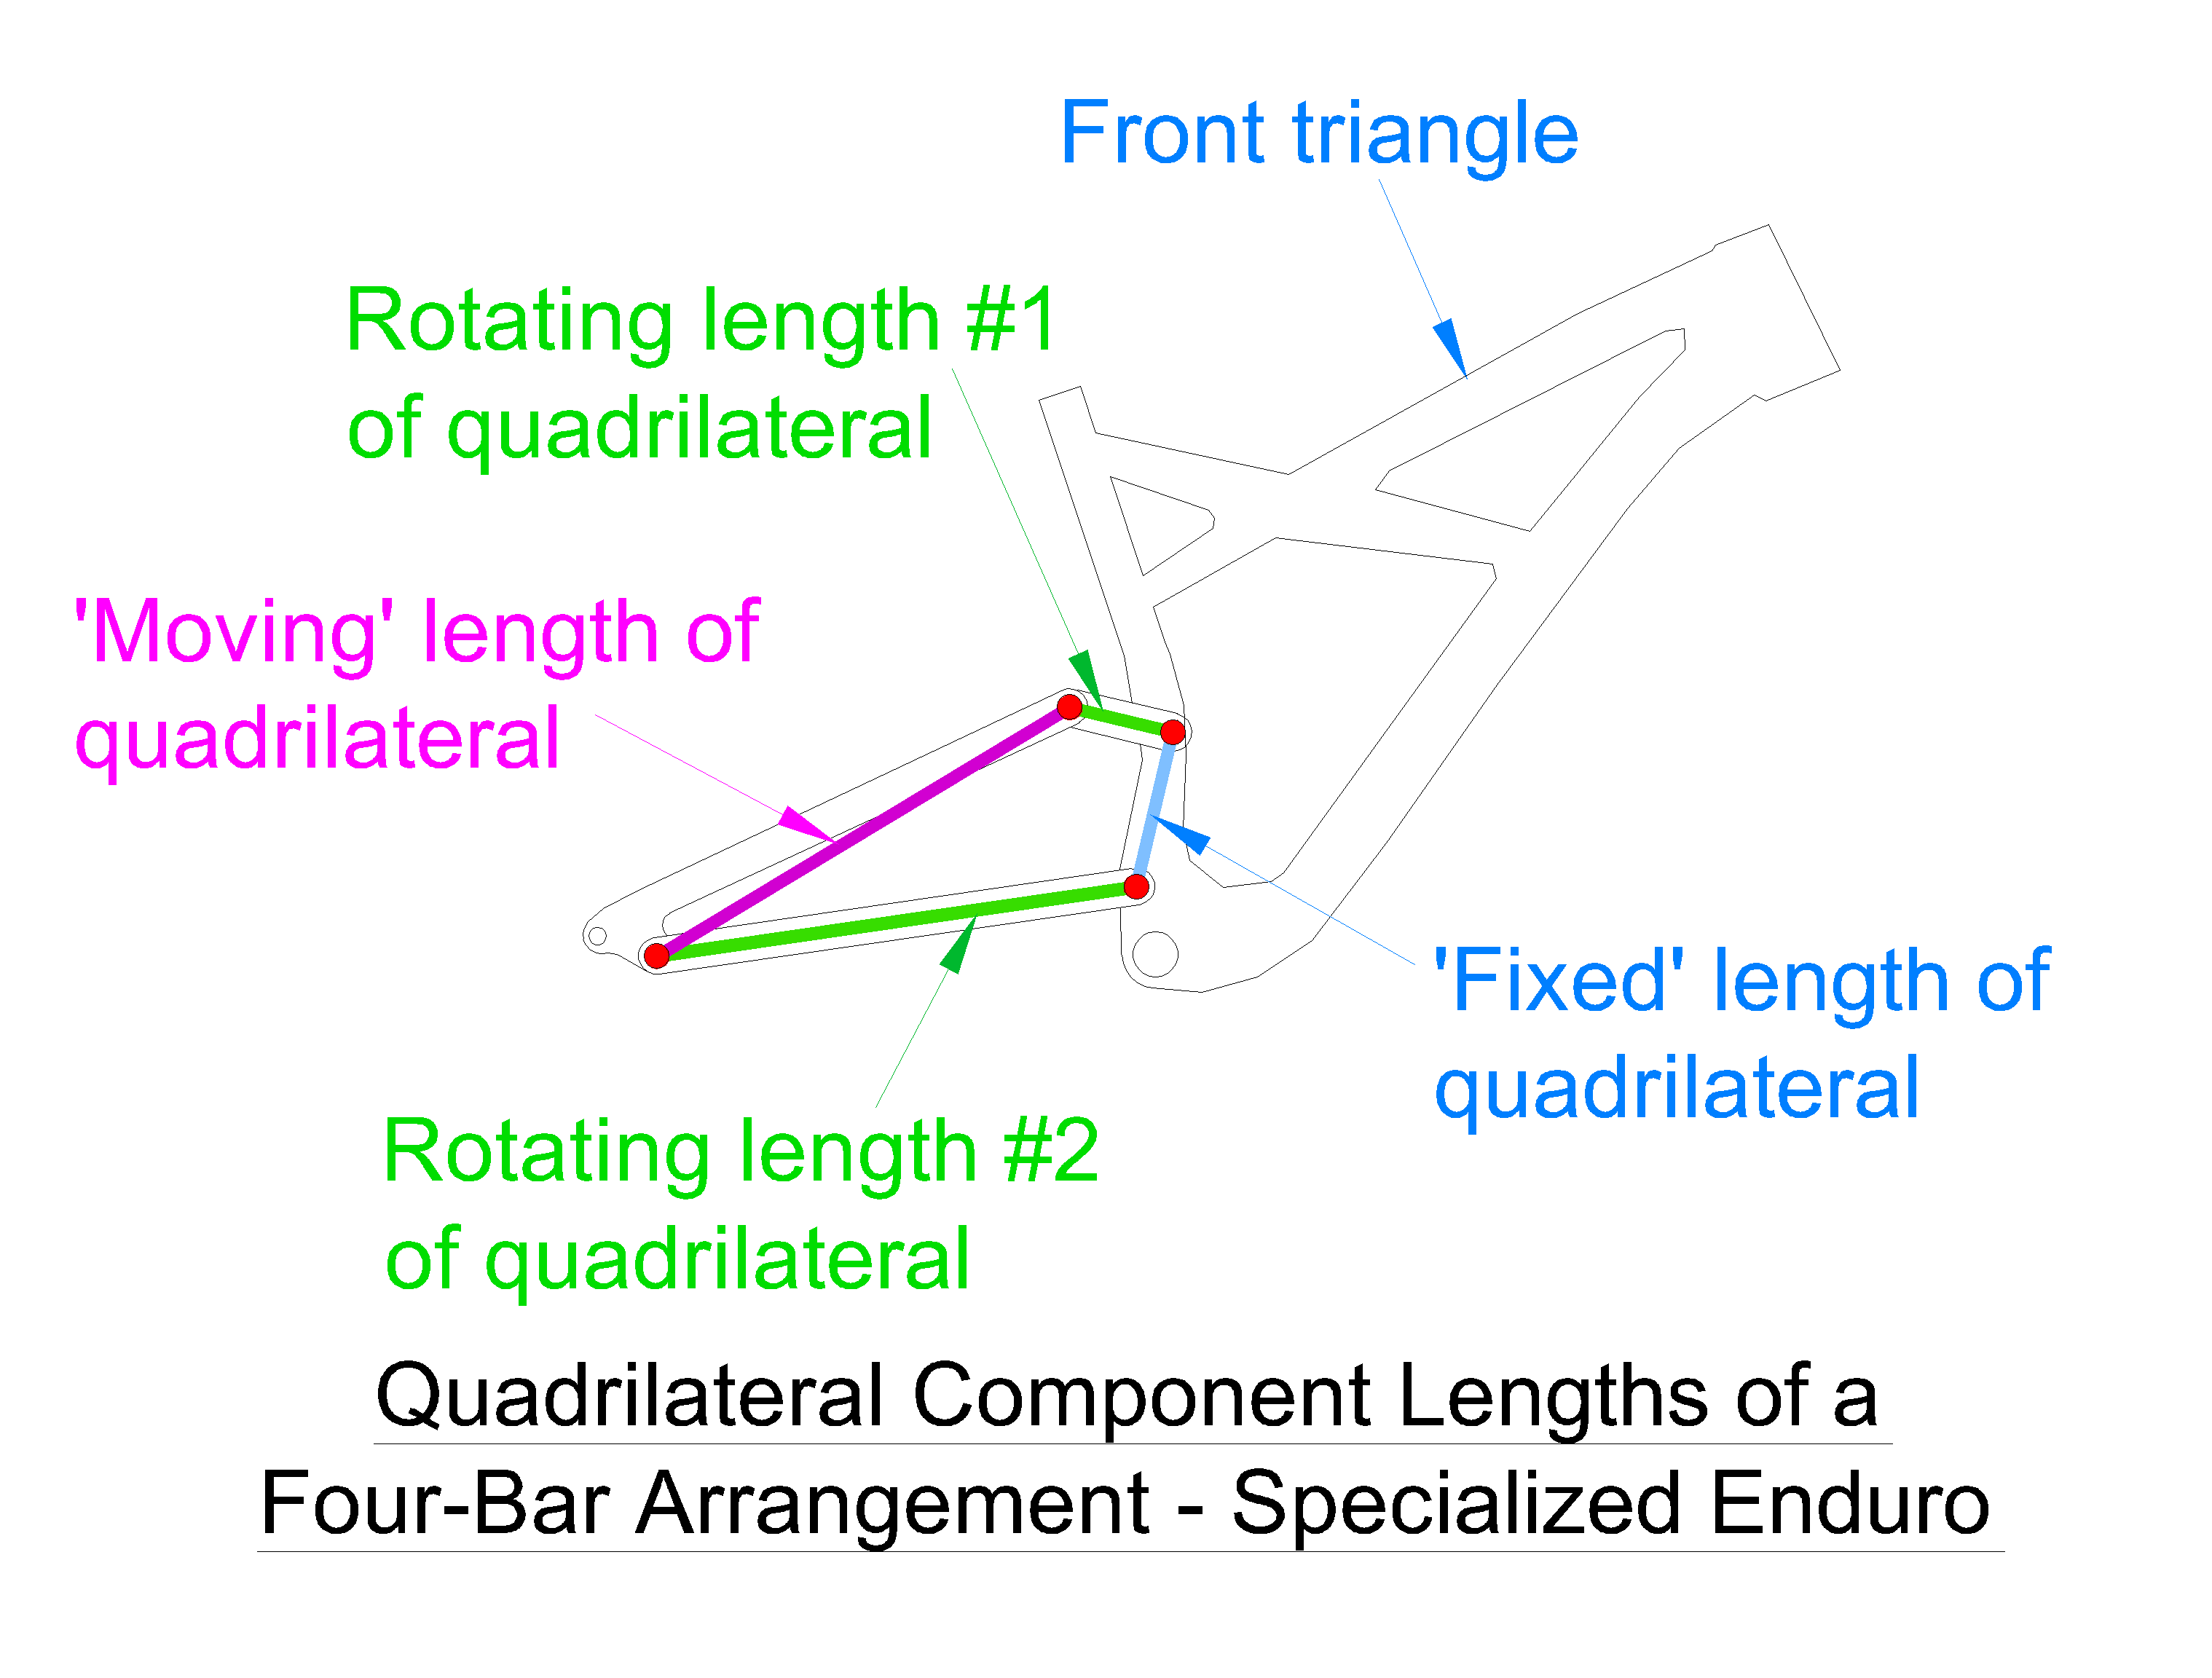
Four-bar and VPP/SDL designs are actually very similar because the rear wheel is essentially attached to one side of a quadrilateral with the frame on the other. Good examples of these types of designs are:
– Specialized Enduro (Four-bar)
– Intense Primer (VPP)
– Giant Reign (SDL)
Just to clear things up: a ‘faux-bar’ is essentially a single pivot bike with a linkage actuated shock and is not a ‘quadrilateral’ design which the ‘four-bar’ is. The tell-tale sign of a four-bar is a pivot on the chainstay not the seatstay.
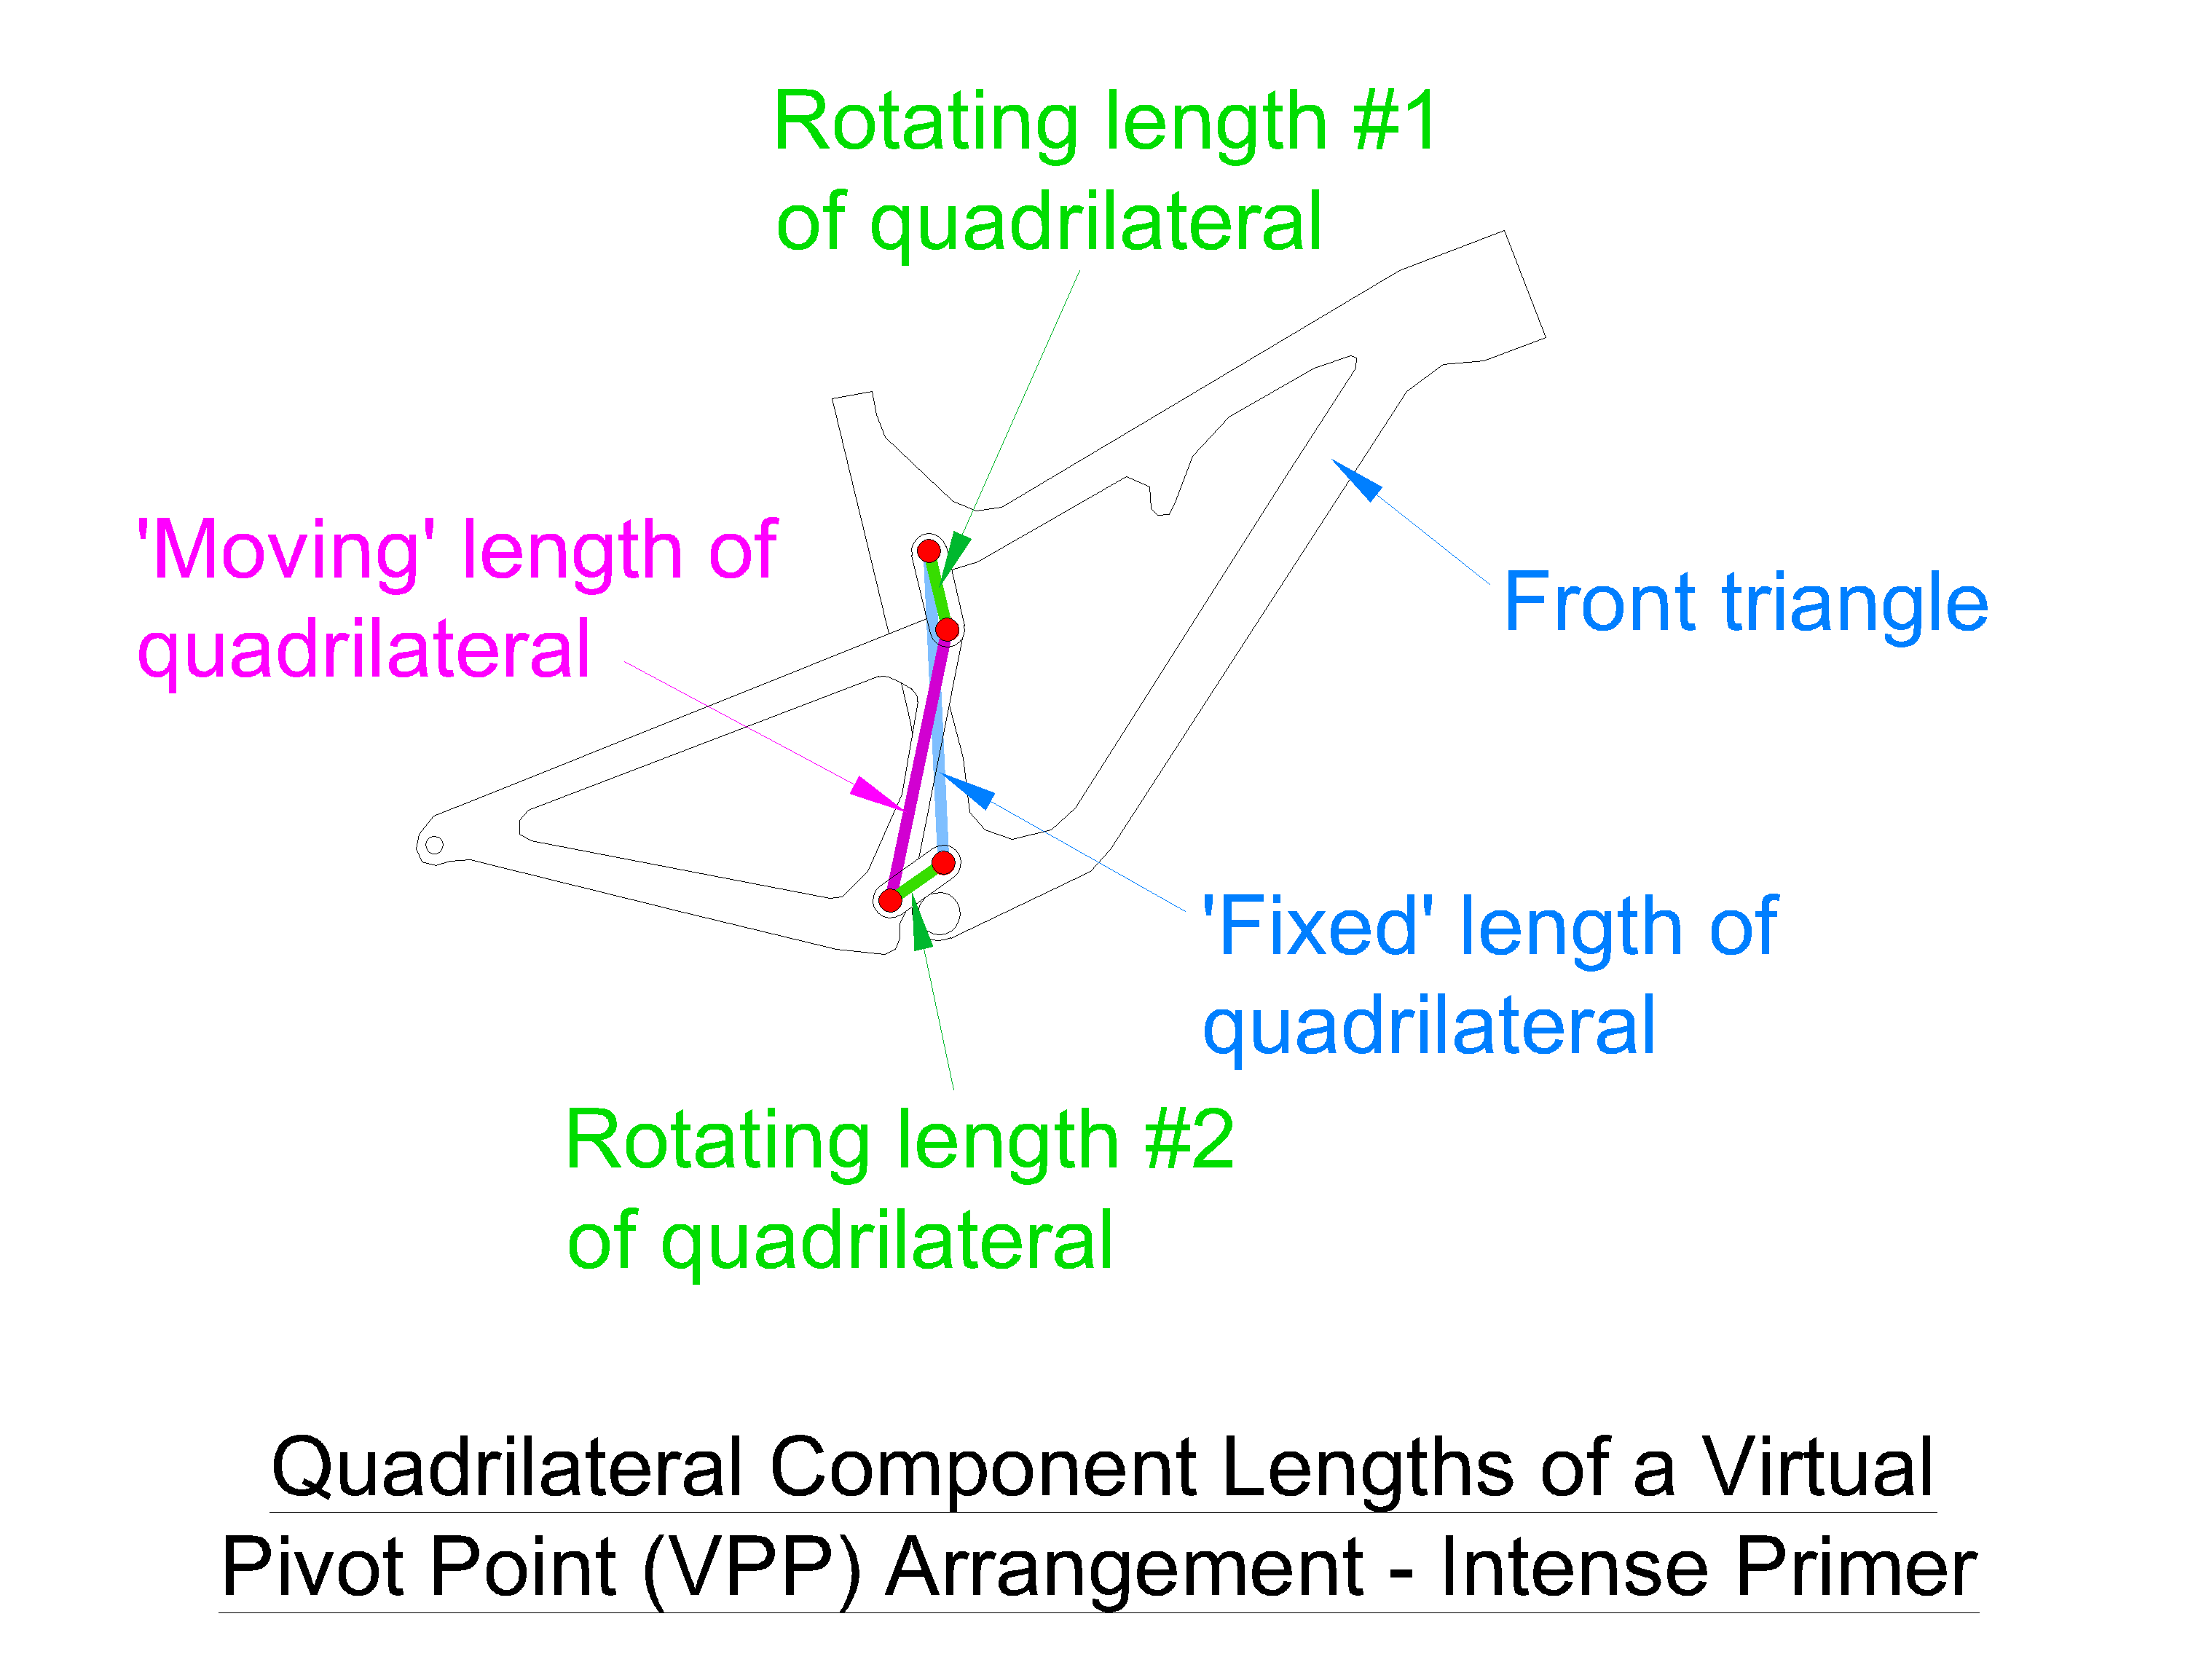
Depending on the lengths of this quadrilateral, the axle path can be modified. For a four-bar design the rotating lengths of the quadrilateral are relatively long, whereas a VPP/SDL, the rotating lengths are relatively short. Both four-bar and VPP/SDL systems have an ‘instant centre’ and the difference between these two systems is how much and how rapidly the instant centre migrates through the suspension travel.
To understand what an instant centre is it’s first necessary to consider a single pivot design (Orange 5) where the swingarm pivots about a single point – simples. The axle path is very simple to understand in this arrangement. For a VPP or SDL bike, the pivot essentially migrates through the travel.

To determine the location of the pivot location through the travel of a ‘quadrilateral’ frame design, the instant centre is determined by intersecting the rotating lengths of the quadrilateral. Typically for a VPP bike the instant centre/ pivot point starts relatively high for beneficial bump compliance and beneficial drive-chain influence. As the wheel goes through its travel the instant centre falls closer to the BB to reduce negative effects of the drive-chain later in the travel and also bump compliance is less important at this point in the travel.
What’s the difference between a VPP and an SDL?
Not much! There are both ‘quadrilateral’ systems with short linkages. The difference is that a VPP has counter-rotating linkages, whereas with an SDL they rotate in the same direction. In practice, this means the instant centre of the VPP moves forwards through its travel motion, whereas an SDL moves backwards.
In reality you’d be hard pressed to notice the difference on the trail between these two. Some of you might remember when VPP bikes came on the scene in the mid-Noughties and there was a lot of talk about ‘S’ shaped axle paths. This was true for certain designs, but in reality was very much exaggerated for marketing purposes.

